It’s so confusing, which should I buy? The Serger or Overlock machine, which one do I need most? It’s a hard decision, both do basically the same thing. They perform finishing stitches. A serger performs one task perfectly–overlocking, cutting and finishing seams in one step.
The real difference is with the make and model of the serger. Some have 8 spools of thread. WOW how confused can one person be? From what I have been told the number of spools increase the number of stitches the machine is capable of doing. On that note the serger handles knits superbly.
An overlock describes it’s main use, to finish edges with the overlock stitch. They have fewer spools of thread, and less decorative stitches. It does not have a cutting attachment. here they are having a discussion about the differences and the ones they prefer most. If you don’t care about people’s opinion, I found a great blogger who explains the machines very well. Over at SergerPro they advise finding a serger easy enough for anyone to manipulate. I agree whole heartedly!! Automatic or color-coded features are recommended for threading. Of course I’m a penny pincher and I would choose the cheapest one on the market.
aking a final decision on the serger sewing machine starts with knowledge of the most important factors needed in a quality machine. The top serger machine will be easy enough for even an amateur to manipulate. It should have an acceptable differential feed for material versatility along with automatic or color-coded threading features. The serger will have the appropriate number of threads as well as various stitching styles. Along with offering helpful attachments, the machine should be reasonably priced considering how it will be used. I look for FAST machines. I love being able to sew my clothing at a rate to wear it the same day I start if I want. At the time of this blog, I found the Brother 1034D was the top seller.
With the SINGER 14CG754 ProFinish and the JUKI MO644D Portable Serger close behind. I would have to study the machines and their options a lot closer to make a decision. My heart says SINGER, that’s all I’ve ever used. That doesn’t mean it’s the best choice. You can find a great article here comparing options, price, and brand. I hope you find the serger machine of your dreams and ENJOY!
Pantone chose two colors this year. They look pretty much like pink and blue but their names are much more complicated. Rose quartz and Serenity are the official names. The colors made use of gender blur as inspiration relating to fashion. The choice of these colors impacted other areas of design. As gender becomes less important and more equal, this generation’s concerns do not lie in judgement. The generation is not worried about being typecast and expresses themselves through color, pink and blue, if you wish to call it that are statement colors as to what is going on around us. The colors are a celebration of equality!
Whether in soft or hard surface material, the pairing of Rose Quartz and Serenity brings calm and relaxation. Appealing in all finishes, matte, metallic and glossy, the engaging combo joins easily with other mid-tones including greens and purples, rich browns, and all shades of yellow and pink. Add in silver or hot brights for more splash and sparkle. I can’t wait to use these colors! They are compatible with nearly all skin tones and have a playful nature to them.
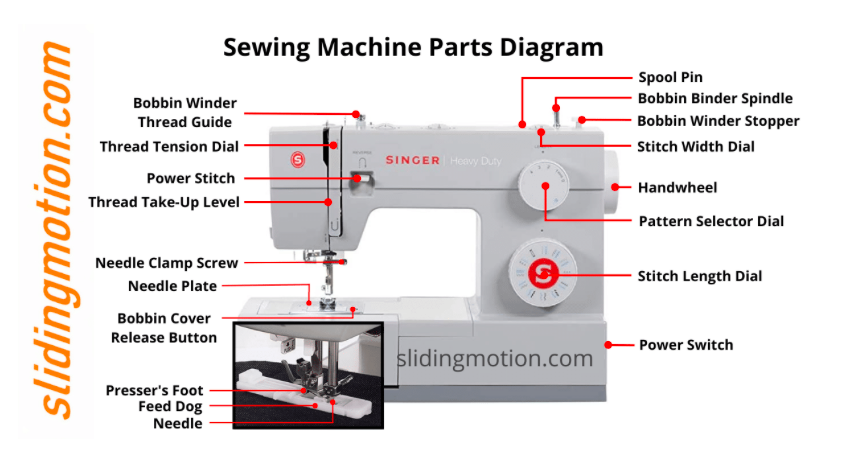
Knowing the parts of a machine is the most important part of sewing. Seriously! All that tech garbage just gets in the way of creativity. But, nonetheless, these parts of a machine are extremely important to know. If you do not know the thingamajig is actually the feed dogs, no one can help. Because when you ask for help they will have no way of explaining to you how to accomplish what you want. I’m including a video to help you through the darkness of the valleys. Hopefully encouraging you not to quit sewing before you get started just because the parts of a machine are bullying you.
I promise over time you’ll learn these things and sewing will be a breeze. Pretty good graphics but they are not exactly the same on every machine. the best place to look is your menu. Once you learn about your machine. How to thread the needle, what the parts of the machine do, and most importantly how to turn it on, you’ll be ready to practice sewing some straight lines.
Some people start sewing on paper, following a pre-drawn line. I was afraid it would somehow kill the sewing machine. I started with making curtains and pillows. Those are two simple projects that can be made quickly and are fulfilling. ENJOY!
Christmas was a few weeks ago. Who received a brand new sewing machine? Now what? If new sewing person or it’s been about say, 25 years or more, I may be able to help.
Threading the needle on your new sewing machine. It seems something that should just happen, right? In reality it’s not that easy. Read the manual, if you still cannot threat it or the bobbin. YouTube has amazing tutorials.
That’s a great accomplishment. Now, when you start sewing make sure to hold onto the bobbin thread and the top thread for a few (10) stitches. If you don’t, you get a horrible thread mess and hate yourself for wanting a machine. Trust me on this.
Another helpful hint, make sure your first stitch onto the fabric is no on the very corner edge. Even one centimeter down is better than the corner. This sometimes causes the fabric to get stuck in the machine under the feed dogs. Yeah that is a pain for sure.
If the fabric happens to cause a few problems for you like getting stuck and not letting your needle or machine operate, rock the wheel on the right end back and forth until you can free the needle.
I discuss bird nesting, that horrible annoying bobbin mess, here.
Once you get past the initial learning curve of your machine, you’ll be ready to work on some straight lines. You’ll probably need a few supplies to get started.
Important Supplies
*Pins with glass heads
*Pin cushion
*Titanium needles (you will thank me for this later
*Seam ripper (save your project tool)
*Fabric scissors (fiskars…..I made the mistake of buying singer to match
my machine) No skimping here. Good scissors will save you a lot of
trouble.
*Tape measure it’s horribly shocking to have to measure yourself, but