I found my serger! After too much research, comparing, interviewing, and asking for demonstrations I found the one! You see, I have a friend whose a “real” designer. One of her designs even made it to the red carpet. I asked her opinion on which one to buy and why. I really, really wanted a Singer. You see, I’m married to Singer! Love at first sight for us. Singer got us through the 80’s and when I started sewing again, Singer was my first choice. She assured me Singer was a great choice.
She then told me she used JUKI. I asked why, I mean, who wouldn’t want to know, right? She told me she worked with and worked on a lot of different machine brands. JUKI is the strongest and best produced machine, in her opinion. So, of course I kept researching. My researched turned up the same information she already gave me. JUKI is a very well made machine and the lowest end of the line performs just as well as the top of the line. The company was given the Deming Prize for quality control in the manufacturing of industrial sewing machines in 1981. If you would like more information and convincing of the brand go here. Amazon testimonials are also a great source for information when looking for a new machine. The machine I am looking at buying is the Juki MO-50E 3/4 Thread Serger, the customer reviews made me a believer! ENJOY
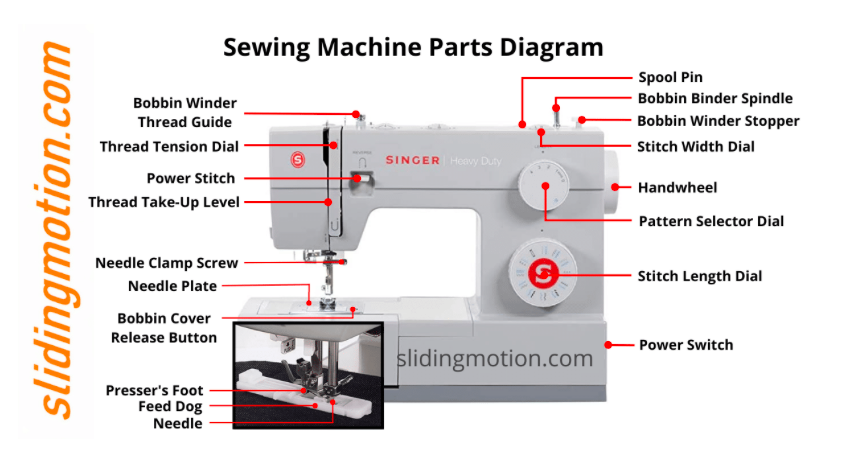
Knowing the parts of a machine is the most important part of sewing. Seriously! All that tech garbage just gets in the way of creativity. But, nonetheless, these parts of a machine are extremely important to know. If you do not know the thingamajig is actually the feed dogs, no one can help. Because when you ask for help they will have no way of explaining to you how to accomplish what you want. I’m including a video to help you through the darkness of the valleys. Hopefully encouraging you not to quit sewing before you get started just because the parts of a machine are bullying you.
I promise over time you’ll learn these things and sewing will be a breeze. Pretty good graphics but they are not exactly the same on every machine. the best place to look is your menu. Once you learn about your machine. How to thread the needle, what the parts of the machine do, and most importantly how to turn it on, you’ll be ready to practice sewing some straight lines.
Some people start sewing on paper, following a pre-drawn line. I was afraid it would somehow kill the sewing machine. I started with making curtains and pillows. Those are two simple projects that can be made quickly and are fulfilling. ENJOY!
Christmas was a few weeks ago. Who received a brand new sewing machine? Now what? If new sewing person or it’s been about say, 25 years or more, I may be able to help.
Threading the needle on your new sewing machine. It seems something that should just happen, right? In reality it’s not that easy. Read the manual, if you still cannot threat it or the bobbin. YouTube has amazing tutorials.
That’s a great accomplishment. Now, when you start sewing make sure to hold onto the bobbin thread and the top thread for a few (10) stitches. If you don’t, you get a horrible thread mess and hate yourself for wanting a machine. Trust me on this.
Another helpful hint, make sure your first stitch onto the fabric is no on the very corner edge. Even one centimeter down is better than the corner. This sometimes causes the fabric to get stuck in the machine under the feed dogs. Yeah that is a pain for sure.
If the fabric happens to cause a few problems for you like getting stuck and not letting your needle or machine operate, rock the wheel on the right end back and forth until you can free the needle.
I discuss bird nesting, that horrible annoying bobbin mess, here.
Once you get past the initial learning curve of your machine, you’ll be ready to work on some straight lines. You’ll probably need a few supplies to get started.
Important Supplies
*Pins with glass heads
*Pin cushion
*Titanium needles (you will thank me for this later
*Seam ripper (save your project tool)
*Fabric scissors (fiskars…..I made the mistake of buying singer to match
my machine) No skimping here. Good scissors will save you a lot of
trouble.
*Tape measure it’s horribly shocking to have to measure yourself, but
The labels went through some change prior to printing. The original draft didn’t seem to fit my branding. The final image is now shown in the feature photo. I love it! I love the thought of putting clothes on with this label.
Are Clothing Tags Important?
I don’t know about you, but, I make a great deal of the gifts during the holiday season. Clothing tags have become necessary. Gifts go home and used without my supervision. Thank goodness lol So, when my granddaughter gets dressed in LucyLou 918 originals. She needs to know her clothing is on her the right way. Also, when I make blankets, purses, scarves, and other wearable items, I want bragging rights. Don’t we all want people to know about our art?
I have tried so many methods of making clothing tags. I’ve used cotton ribbon similar to shoestrings and written on it with a marker. I didn’t like the way it looked. I am professional and my clothing and other items should reflect such in the clothing tags. In the olden days, haha, my grandmother would sew a 1″ piece of lace in the back, she didn’t want me looking silly either.
I’m going to make mine like this:
I’m using my lovely printer, its honestly nothing special. It was free with the purchase of my MacBook Pro about five years ago.
First I’m going to design my logo. Using an illustrator program and possibly a clip art or symbol you create to represent your line.
Then, when I feel fully satisfied with the appearance, I’ll reverse it. This is the MOST IMPORTANT part.
Reversing the image will ensure perfection when ironed onto your ribbon or whatever you choose to use for your clothing tags.
I will do a rough run with printer paper and inspect the logo.
If you need a visual, this is a great video on my channel.
When I’m satisified with the look I’ll print it onto the transfer paper, I bought mine at Amazon. I love their free and fast delivery special! I’ve included a link for you.[envira-gallery id="2444"] [envira-gallery slug="2444"]
I’ll probably use 1″ ribbon to make my labels.
The internet has a great application on the Avery site.
Enjoy! Knowing everyone will know who made your item 🙂
I sew a lot this time of year. I try to be like Santa, HO…HO…HO, time to sew. One thing I’ve made in the past is fleece blankets. No, not the ones with fringe, mine are special and extra cuddly on the back side. I use fleece for the top, well you can use it as the bottom, but the side with the decoration or color the person would like. The backside I use a special minky fabric that coordinates with the top. For children, I use only one yard each of fabric. Adults, I found out by trial and error, mostly error 🙂 need two yards of fabric.
Pins are a necessity! Do not attempt without pinning first. You’ll be really unhappy and it will take twice as long because you will have to use your seam ripper more than anyone would ever like. These fabrics slide a little so they need to be pinned down.
Blanket Tutorial
Measure the fleece and the pinky fabric. They MUST be exactly the same size.
Cut any edges the store may have messed up on cutting. Sometimes the edge may not be exactly straight. The first two steps are the most important.
Pin right sides* together. Pin fabric together at 2 inch or less intervals. This is another opportunity to make sure the fabrics match up properly.
Ready to sew? I use a stretch stitch when I sew mine. I want to make sure these last a long long time. If you do not have a stretch stitch, the zig zag is a good choice. Make sure your seams are 5/8″. Do not sew too close to the edge.
Sew, leaving an 18′ opening to turn the blanket so the design is showing.
Turn the blanket so the design is showing. Hand sew the final 18 inches.
It’s ready for giving. Good Job! I hope you enjoyed it.
For children, this gift can average $20, depending on the fabrics used. Anytime you use a licensed print such as Disney, the fabric is going to cost more. I’m able to make the adult blankets out of two yards using plaid or something non licensed for under $30. These blankets sell retail beginning at $40 and hand made presents are priceless!
*right sides- the side you want facing out when the blanket is complete. Usually the softest side of the fabric or the side with the design.
Lucy’s Sewing Lab gained a new member to her family this week, “Red.” My daughter found her at a garage sale, $15! I feel really bad for the granddaughter who no longer has Red the vintage singer to use as a dumb bell. These are the pictures my daughter sent me of her.[envira-gallery id="2237"] [envira-gallery slug="red-before-i-got-her"]When I finally was able to pick her up, I cleaned her, checked her out, and researched a lot. If you need to research a vintage machine, this is a great place to look. You can get more information and become a member at this site. My machine the Singer 66-16 was the first mass produced sewing machine. Most believe it produces a near perfect stitch in a variety of fabrics. Unbelievably to us at this point, the sewing machine was one of the most expensive at the time. It cost several months wages, I guess I wouldn’t be sewing! The machine may have been expensive, but for professionals, or those who like to think they are pros, and needed more foot clearance Singer 66 was the machine to buy. [envira-gallery id="2234"] [envira-gallery slug="red-certificate"]I got her certified too!
I really cannot wait to get her up and going. The machine is a hand crank, most were urged to convert to electric during the war to increase production. Some women, were stubborn, though, Imagine that, and refused, continuing to work those arms and sew their little hearts out for the men. The factory this machine was created in was destroyed along with all records of the machine were lost in the war. The C series was only made for about 10 years. There is a great video here. I don’t know if you are into vintage machines or not, let me know in the comments! Enjoy!